|
|
|
 |
|
|
|
|


Non Metallic Metal or NMM
A small guide by A. Imrie I've often been asked how I paint my miniatures, especially the NMM. Most people asking tend to have a decent knowledge of miniature painting already, so this will simply be a few opinions, some close-ups and brief reviews of colors used. This area will be updated periodically with different techniques as I complete more projects. Use the bookmarks below to find out about specifics or scroll to read it all. |
||
| Chrome | Rust | |
NMM is the acronym for Non-Metallic Metal, the term referring to a miniature painting technique. It's the practice of using flat opaque colors to represent metal areas. The preferred method is usually metallic paints for metal since it is perceived as easier. NMM is considered a new technique in miniatures, but has existed in art since at least the pre-Christian Roman Empire. The challenge with NMM is making a supposedly metal item painted in flat colour look "real". This is done with careful blending and an understanding of the way metal is affected by it's surrounding light sources. For an excellent article on this visit The Fantasy Art Resource Project. It's the bible for understanding NMM on the internet. I tend to work off of either Black or White primers depending on the miniature I'm painting. In some cases one would recommend undercoating an area white on a black primed miniature. It may seem like an extra step. But its actually a shortcut to get things to work properly, especially when painting lighter colors. Especially as I tend to work from the darkest color up to the brightest. And you can never say it enough... You have to keep your paints thin! All paints are Games Workshop Citadel or Vallejo Model Color.
|
||
|
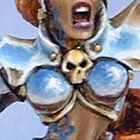
Black / Dark Silver NMM:
Darkest areas are
either pure black or a mix of Chaos Black and Vallejo’s Intermediate Blue. More
Intermediate blue is added and highlights from that are up to pure white. Can be
done on either a black or white undercoat.
|
|
|
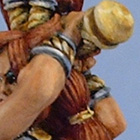
Bronze NMM:
Darkest Areas are
Vallejo Burnt Cad Red mixed with Chaos Black. Keeping this mix, I begin to add white to it
for highlighting. I’m still somewhat hesitant about using this mix.
Can be done on either a black or white undercoat.
|
|
 |
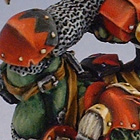
Chrome NMM : The blue mix consisted of GW Enchanted Blue,
Vallejo Model Color’s Ultramarine and White in equal parts. This mix is the darkest
part of the blue and it is highlighted up to pure white on the “sky”portions of
the chrome. The brown is Vallejo’s SS.Cam Black Brown highlighted up with a Vallejo's
Beige Brown and from there up with white. All the final highlights are pure Skull
White. Must be done on a white undercoat. I usually figure out where my "earth" is first and in what direction the highlighting goes. Then the darkest parts of the blue is marked out and the rest is just highlighting to white on both sky and earth. The horizon is also pure white, contrasting nicely with the darkest part of the brown. |
|
 |
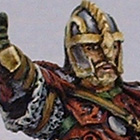
Gold NMM:
Darkest areas are
painted with GW Bestial Brown. This is lightened with Vallejo Lemon Yellow. This
eventually produces a color similar to GW Sunburst Yellow. Highlights are then mixed
in with GW Skull White up to pure white. Must be done with a white undercoat.
|
|
 |
Red
NMM: I
use Vallejo Burnt Cad. Red as my darkest color working up to Vallejo’s Flat Red.
Using a mix of GW Blazing Orange (an old paint) and white I carefully mixed with the
red and slowly work my way up to near-white highlights. One must try to be careful to not
get too orange or too pink. Can be done on either black or white undercoat,
I'd recommend white though.
|
|
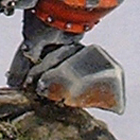 |
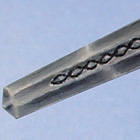
Rust (iron) NMM:
Rusting iron is done by
stippling a very thin mix of translucent GW Dark Flesh on directly onto the finished NMM
areas with the darkest areas receiving the most brown stippling.
|
|
 |
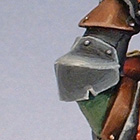
Silver / Steel NMM: For a polished bright steel I use
Vallejo’s Intermediate Blue with a teeny touch of GW Nauseating Blue as my darkest
areas. More Intermediate blue can be added for a grayer steel. Or simply add in pure white
for a mithril quality. In both cases highlights from that are up to pure white. Can
be done on either black or white undercoat. I'd recommend white though.
|
|
Other Little Secrets: Remember to give your miniature a dead flat protective finish with a matte sealer. It'll reduce reflection from undesired light sources on your NMM, and protect your hard work! Keep a piece of kitchen cutlery around your work area (eg. spoon, fork). While painting, study how the light plays along it in an area shaped similar to what you are working on. It's an excellent on-hand reference.
|
||
|
The Fantasy Art Resource Project: It's the bible for NMM on the internet! Jenova Project:. there are many wonderful close-ups of NMM on this great site's tips section.. Coolminiornot: has an extensive article section with many on NMM. Also some of the best examples of NMM and miniature art in general can be found here. |
||
© A.Imrie 2003