|
|
|
 |
|
|
|
|


Badruck 'Eadsplitta Black Orc Warlord
How I painted Badruck...
Use the bookmarks below to find out about specific parts or scroll to read the whole thing. I'm not a Pulitzer winner, so forgive me for any grammatical errors. :) Let's go!
|
||
| Black/Silver Metal | Rust | |
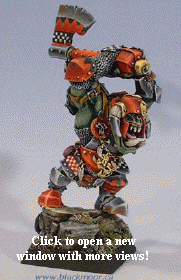
This is a Games Day 2000 limited edition Black Orc Warboss. He is not available through Games Workshop and could only have been had at the GD. I skipped that whole bit though and bought it on eBay for $15 US in December. I made sure it would rank up with the rest of both the old and new Black Orc Squads we have, so the base may look a tad smallish. Orc Armor is generally haphazard and fairly ugly. As this type of Orc would have choice pick of armor, I decided to do NMM ( NMM is the acronym for Non-Metallic Metal, a painting technique) on him and maybe even try for some rust on it. I spent a large amount of time studying the works of Cyril, to see how he got something ugly to look good in NMM. Also I had the many wonderful close-ups of NMM on Inge’s great page: http://www.jenova.dk/ to help guide me through the huge chunks of metal on him (Thanks Inge!) The light source was determined to be from above, and I attempted to adjust the lighting for something like his axe being above his armor and leg position underneath him as well. Many different techniques were used to get the feeling of the variety of metal chunks of his armor. Some bits of his arsenal have three different colors layered on top of each other, before I settled on whatever one we see on that bit. All paints are Games Workshop Citadel or Vallejo Model Color. Preparation: No conversions on this guy. Just filing, a soapy wash, and GW Black Primer. He was inserted into a slotta base on a paint bottle for easy handling. His axe and head are left off till almost the end and are painted separately from the rest of the model. The entire miniature was given a wash of Black ink to fill in any areas that the primer didn’t hit. The brighter sections of armor are undercoated white. The areas for the Red “Dags” (zigzag pattern) are defined here too. Two layers of thin white are painted up almost like highlights on all the skin areas and teeth. Now I go back to the armor to plan out the check pattern with a Micron Pigma 02 pen. The mini is sealed after with a quick shot of matte clear coat. I find this makes my paint adhere better and the ink doesn’t smear when it gets painted over. Skin: Translucent GW Dark Angels Green highlighted up to Goblin Green. Uppermost highlights are Rotting Flesh with a teeny touch of yellow mixed in. The tongue is Liche Purple highlighted up with Tentacle Pink, and white. Eyes: Eyes get some Black ink in the crevices, then they are picked out with pure white. Darkest areas are GW Red Gore, highlights are Vallejo Flat Red up to yellow and a dot of white. Teeth, Bones, Nails: Transparent Bubonic Brown is used. This is lightened with some white to almost the same tint as GW Bleached Bone. Then I used my top-secret (I don’t even know anymore!) never-to-be-replaced mix of thinned brown ink to give it a bit of a gritty look. We go back with the Bleached Bone type mix up to pure white highlights. The tongue and teeth picked out with GW gloss varnish. Black/Silver Armor: Darkest areas are either pure black or a mix of Chaos Black and Vallejo’s Intermediate Blue. More Intermediate blue is added and highlights from that are up to pure white. Gold: Darkest areas are painted with a transparent wash of mixed GW Leprous Brown and GW Bestial Brown, this mix is lightened with Vallejo Lemon Yellow. This produces a color similar to GW Sunburst Yellow. Highlights are mixed in with GW Skull White up to pure white. Bronze: Darkest Areas are Vallejo Burnt Cad Red mixed with Chaos Black. Keeping this mix, I begin to add white to it for highlighting. I’m still somewhat hesitant about using this mix. Red: The red NMM was the hardest to achieve. I used Vallejo Burnt Cad. Red as my darkest color working up to Vallejo’s Flat Red. I use a mix of GW Blazing Orange (an old paint) and white carefully mixed with the red and slowly work my way up to near-white highlights. I tried to be careful to not get too orange or too pink. Scabbard: I painted the scabbard a variety of colors. Nothing seemed to satisfy me so eventually I resorted to my favorite color... Nauseating Blue with white mixing in for highlights. Rust: The rust was achieved by stippling a very thin mix of translucent GW Dark Flesh on directly onto the metal areas with the darkest areas receiving the most brown stippling. Leather: Scorched Brown mixed up to Bubonic Brown with Snakebite Leather as the final highlights. Details: The black area of the checks and dags were painted and highlighted like the black armor. The white areas of the checks are cleaned up with Elf Grey highlighted up to pure white. The Moon Glyph on his shoulder pad was a last minute addition when the nearly completed model fell off a shelf and got a big chip out of it :(. I realized I could never get the dags on that pad right again without stripping it, so a circle was drawn out in black and painted white. The glyph is based on a picture from the fourth edition Orc army book. It was painted in the same manner as the gold NMM. Base: The base is a RAFM skull, epoxy putty, and sand. The base was painted with GW and Ral Partha paints. Some GW static grass is added and the base is primed Black. Everything is painted in much the same manner as the teeth but there is an additional quick drybrush of various shades of gray in random areas to get the feel of stone. The grass is drybrushed with Vallejo Flat Green, The base is clear coated before it was flocked. The flock is mix of a dark green flock and Woodland Scenics Tundra flock glued on with Elmer’s All-Purpose White Glue. Other Little Secrets: Transparent paint mixes were made by using a 4:1 water/future mix of Future no-wax floor finish in with the paint. I also usually load my brush with this before it gets loaded with paint. As it will be a gaming mini, the Orc was given a dead flat finish with Testors dull-coat. |
||
Painted February 2003